

Tool Description
The New Quizzes tool is an advanced assessment engine designed to meet both current and future classroom needs. By leveraging modern technologies, New Quizzes offers enhanced features and new question types.Overview of New Quizzes
The Classic Quizzes tool has been in use since the transition to Canvas.While it will no longer receive new feature updates, any glitches will still be addressed and resolved. Meanwhile, New Quizzes will continue to receive updates and new functionalities over time.It is important to understand the differences between Classic Quizzes and new Quizzes and Choose the tool that best fits your instructional needs. Please review the information below to better understand the current functionality of New Quizzes and what you can expect moving forward regarding quizzes in Canvas.
Deciding whether to use Classic or New Quizzes |
|---|
|
|
|
Tips to aid in deciding between Classic and New Quizzes |
|---|
|
|
|
|
|
|
|
|
|
|
|
Set or reset the Default Quiz Engine in your Canvas Course
Canvas offers two Quiz engines that instructors may use to build quizzes in their Canvas Courses:Normally, when an instructor adds a new quiz to their course, they will be prompted to select which quiz engine they would like to use to create the new quiz. However, instructors may also choose to make one or the other default for their course.
Select a Default Quiz Engine
Instructors may set either the Classic or the New Quiz engines as the default for any course they teach. They may do so when creating a new quiz in their course. When they see the prompt to do so, they may select the quiz engine to set as the default, place a checkmark in the box next to Remember my choice for this course, and click Submit.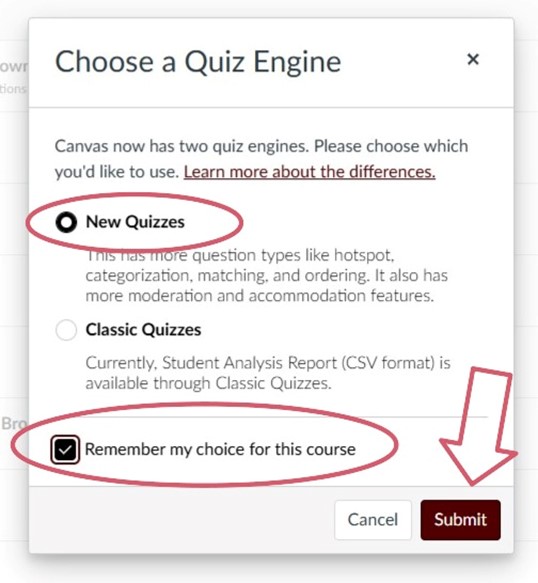
Once you set a default quiz engine for your course, you will no longer be prompted to choose a quiz engine for any new quizzes created in this course. If you would like to change your default selection, you will need to reset your quiz engine choice settings (see below).
Reset your Quiz Engine Choice
You may need to reset your Quiz Engine Choice by navigating to Quizzes in your course, selecting the three vertical dots in the right-corner, and selecting Reset quiz engine choice. Refresh your browser if necessary.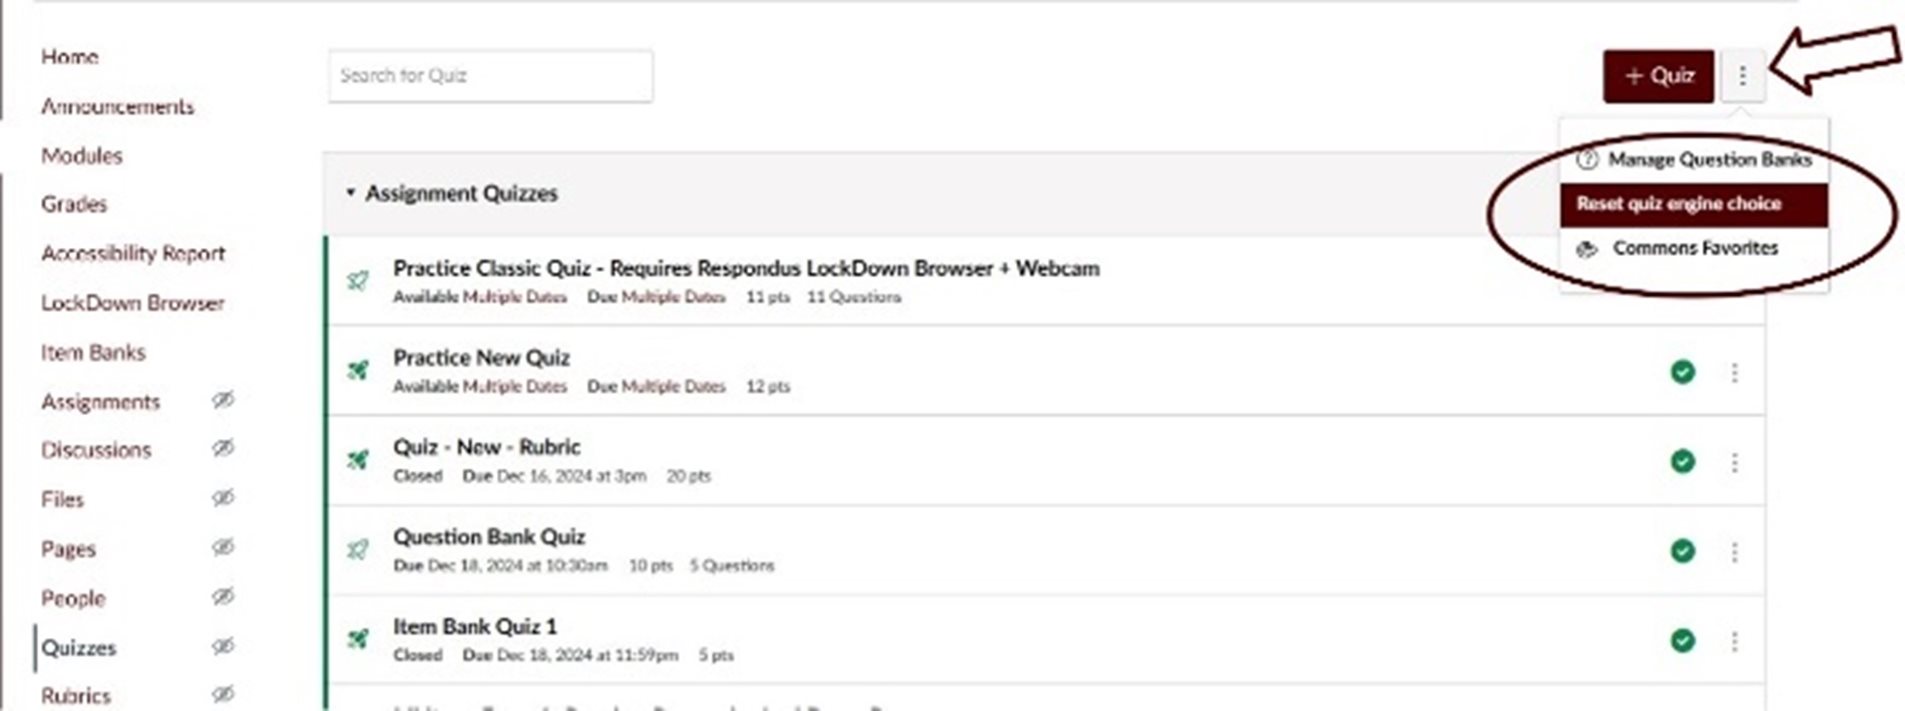
Step 1: Create a Quiz using New Quizzes
- From the course navigation, click on Quizzes.
- Click on +Quiz on the top right to create a new quiz.
- In the Choose a Quiz Engine screen, select the New Quizzes option.
- Click the Submit button.
- Enter a name for the quiz.
- Enter total points possible.
Note: "Submission Type" field is intentionally greyed out and not editable. - Optional: Add a due, available from, and available until date.
- When ready to build your quiz, click Build.
Step 2: Build a New Quiz
- Enter a title for the New Quiz.
- Optional: Enter instructions for students.
- Add questions to the quiz by clicking the + (Add) button.
- How do I create an assessment using New Quizzes (Only in New Quizzes)
- Essay
- File Upload
- Fill in the Blank
- Formula
- Hot Spot (Only in New Quizzes)
- Matching
- Multiple Answer
- Multiple Choice
- Numeric
- Ordering (Only in New Quizzes)
- True or False
- Stimulus (Only in New Quizzes)
Step 3: Modify Setting for a New Quiz
- Click on the Settings tab.
- Enable the settings you would like to apply to your assessment
- Shuffle questions
- Shuffle answers
- One question at a time
- Require a student access code
- Time limit
- Filter IP addresses
- Allow calculator
- Allow clearing selection (Multiple Choice)
- Show custom feedback with results
- Allow multiple attempts
- Restrict student result view
Step 4: Add Quiz to Module and Publish
- From the course navigation, click on Modules.
- Locate the module you would like to add this assessment to.
- Click on the + (add) button on the top right of the module.
- Click on the Add drop-down menu and select Quiz.
- Select the name of the quiz.
- Click Add item.
- Once the item is added, click on the Publish icon on the right-hand side (green checkmark).
Step 5: Add Accommodations for All New Quizzes (If Necessary)
Adding accommodations in New Quizzes enables to set them for students for all New Quizzes within the course. For example, you can accommodate students who need Extended time on quizzes.
- From the course navigation, click on Quizzes.
- Click on the name of the quiz to access it.
- On the bottom right of the page, click on Build.
- Navigate to the Moderate tab.
- Locate the student(s) you need to add a moderation option to.
- Click on the student(s) name.
- Select the time adjustment accommodation:
- Give additional time
- Remove the time limit
- Time limit multiplier
- When done, click Save.
Step 6: Moderate Quiz for One-Time Use (If Necessary)
Moderating a quiz in New Quizzes allows you to modify individual assessment accommodations for students for the New Quiz in the course. A student, for example, who needs an additional attempt for a specific quiz will benefit from this feature.
- From the course navigation, click on Quizzes.
- Click on the name of the quiz to access it.
- On the bottom right of the page, click on Build. Navigate to the Moderate tab.
- Locate the student(s) you need to add a moderation option to.
- Click on Moderate.
- Select the time adjustment accommodation:
- Additional Attempts
- Time Adjustment
- When done, click on Apply.
Step 7: Moderate Quiz for Reduces answer choices (If Necessary)
New Quizzes allows the Reduced answer choices, which removes one incorrect answer from all multiple-choice questions with four or more options.
- From the course navigation, click on the Quizzes.
- Click on the name of the quiz to access it.
- On the bottom right of the page, click on Build. Navigate to the Moderate tab.
- Locate the student(s) you need to add a moderation option.
- Click on Moderate.
- Select Reduced answer choices.
- When done, click on Apply.